React Native for front-end developers

A while ago I decided that my next side-project would be to build a native app with React Native. After spending over six months developing a native app, I want to help spread the word about all of the similarities it shares with building web applications. I’d never built a native app but it had always interested me. There have been ways to build apps with web technologies for a long time now, however the ability to create a native app rather than a hybrid app with these technologies sounded very intriguing to me. I was keen to build more things with React, and with their ideology of learn once, write anywhere, I was sold.
After many different definitions for what the minimum viable product should be, Console Brawl was finally released to the app store a couple of months ago. It’s a pretty simple concept, it pits two video games consoles against each other, and provides the user with a number of head to head matchups with games from each console in order to find out which console the user prefers. If you’d like to find out more info about it check out this case study I wrote.
What is React Native
As the react native website states; with react native, you don’t build a “mobile web app”, an “HTML5 app”, or a “hybrid app”. You build a real mobile app that’s indistinguishable from an app built using Objective-C or Java. React Native uses the same fundamental UI building blocks as regular iOS and Android apps. You just put those building blocks together using JavaScript and React.
It’s come a long way since it was first open sourced in 2015, and is being used by many companies. Instagram Engineering recently released an article explaining how integrating react native into their codebase allowed them to increase developer velocity:
Developer velocity is a defining value of Instagram’s mobile engineering. In early 2016, we started exploring using React Native to allow product teams to ship features faster through code sharing and higher iteration speeds, using tools like Live Reload and Hot Reloading that eliminate compile-install cycles.
Highlighting that you don’t have to build an app from the ground up in React Native to reap the benefits.
Front-end developers will feel at home
From getting started to the development workflow, there are a lot of similarities that will make front-end developers feel right at home. All of the code you’ll write will be JavaScript, with ES2015 support out of the box. You build your components with React. You can manage state with Redux or any other method you could with regular React. Styling is accomplished with a subset of CSS in JavaScript. You work with external API’s by making requests with the Fetch API, yes, the exact same API that’s built into browsers. External libraries are installed with NPM and utilised the same way as we’re used to with ES2015.
Getting Started
To build an iOS app you need a Mac, as you need Xcode. But Android apps can be built on Windows or Mac. To get started, you just need to have Xcode installed (you actually don’t even need to have Xcode installed anymore if you use create-react-native-app). Then install the CLI with Node:
npm install -g react-native-cli
You can then use the React Native command line interface to generate a new React Native project:
react-native init AwesomeProject
cd AwesomeProject
react-native run-ios
You should see your new app running in the iOS Simulator shortly. Congratulations! You’ve successfully run and modified your first React Native app.
React native ships with ES2015 support, which means no need to set up something like Babel to transpile your JavaScript. You will just need to understand the basic React concepts like JSX, components, state, and props to get started. If you already know React, you’ll still need to learn some React-Native-specific stuff, like the native components. Here is the Hello World app from the official docs:
import React, { Component } from 'react';
import { AppRegistry, Text } from 'react-native';

class HelloWorldApp extends Component {
  render() {
    return (
      <Text>Hello world!</Text>
    );
  }
}
AppRegistry.registerComponent('HelloWorldApp', () => HelloWorldApp);
All looks pretty familiar if you’ve used React before. Except for the AppRegistry, this just tells React Native which component is the root one for the whole application. But you won’t have to worry too much about that, as it’ll probably only be used once in your app.
React Native Building Blocks
Most of the basic building blocks of React Native could be mapped to an equivalent web element. Here’s some examples:
<div>→<View><span>→<Text><img>→<Image><button>→<Button><input type="text">→<TextInput>
When first starting out I found that thinking about it in this way helped me decide what components to use to build a piece of UI. The concept of state and props is exactly the same. Redux also works as it would in a web app, you even use the same NPM package. The main thing you have to learn and get used to are the native components. The official docs are a great resource for this, and have detailed info and examples on each and every React Native component. For me, these docs were pretty much like MDN for React Native development.
Style and Layout
With React Native, you style your components with CSS in JavaScript. Every core component accepts a prop called style to add your classes or inline styles. It’s important to note that React Native only includes a particular subset of CSS properties, some components may only accept certain properties. The official documentation will have all the information you need. CSS properties usually match their web equivalents, but are camel case instead of snake case. Here is an example of a component with styling:
import React, { Component } from 'react';
import { StyleSheet, Text, View } from 'react-native';

class BaStyles extends Component {
  render() {
    return (
      <View style={styles.container}>
        <Text style={styles.largeText}>Welcome</Text>
        <View style={styles.textContainer}>
          <Text style={[styles.largeText, styles.white]}>to Console Brawl</Text>
        </View>
      </View>
    );
  }
}

const styles = StyleSheet.create({
  container: {
    backgroundColor: '#000',
  },
  textContainer: {
    flex: 0.5,
    justifyContent: 'center',
    paddingLeft: 10,
    paddingRight: 10,
  },
  largeText: {
    fontWeight: 'bold',
    fontSize: 30,
  },
  white: {
    color: '#fff',
  },
});
Flexbox is the main layout method, and is designed to provide consistent layout on multiple screen sizes. It’s also possible to use fixed dimensions if you want something to be exactly the same size regardless of the screen size. All dimensions in React Native are unitless, and represent density-independent pixels. Absolute positioning, margins and padding are all also supported.
Network Requests with the Fetch
React Native provides the Fetch API for making network requests. This is exactly the same API that is available in modern web browsers. And as of recently, you can even use the proposed ES2017 async/await syntax to make your requests. Here’s an example from the official docs:
async function getMoviesFromApi() {
  try {
    let response = await fetch('https://facebook.github.io/react-native/movies.json');
    let responseJson = await response.json();
    return responseJson.movies;
  } catch(error) {
    console.error(error);
  }
}
So nice! Check out the docs for more information on making network requests.
Development Workflow
It really doesn’t feel very different to a modern web development workflow. Except you don’t need to set up your own build process, that’s taken care of for you. This includes hot reloading. Compared to regular native app development, React Native lets you build your app faster as you don’t need to recompile all the time.
There are many open source NPM packages available for React Native. You install and require them the same way we’re used to in ES2015 apps. You can even use the same packages we use for the web, an example of this is redux.
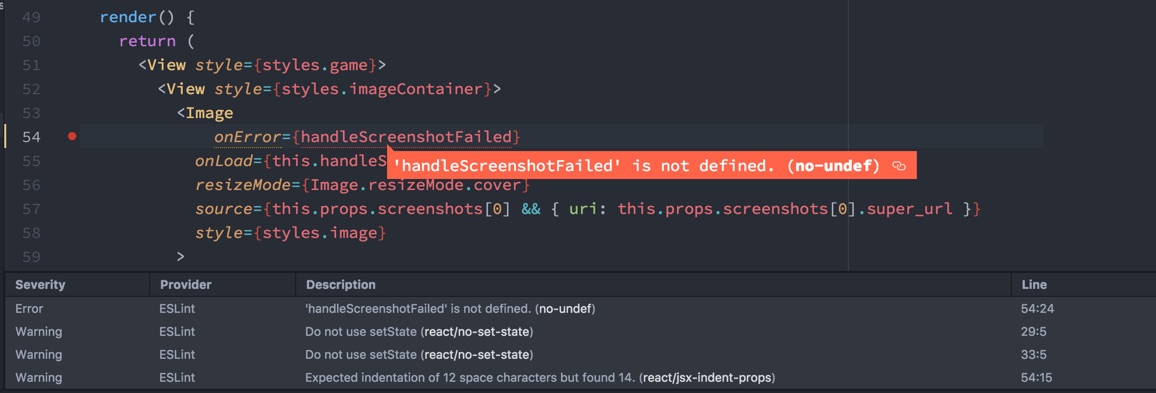
Setting up linting is much the same as we’re used to. I used ESLint with AirBnB’s JavaScript rules. But rather than adding an extra build step, I set linting up in my code editor, Atom. I like this setup because you get realtime linting. Below is an example of what this looks like:
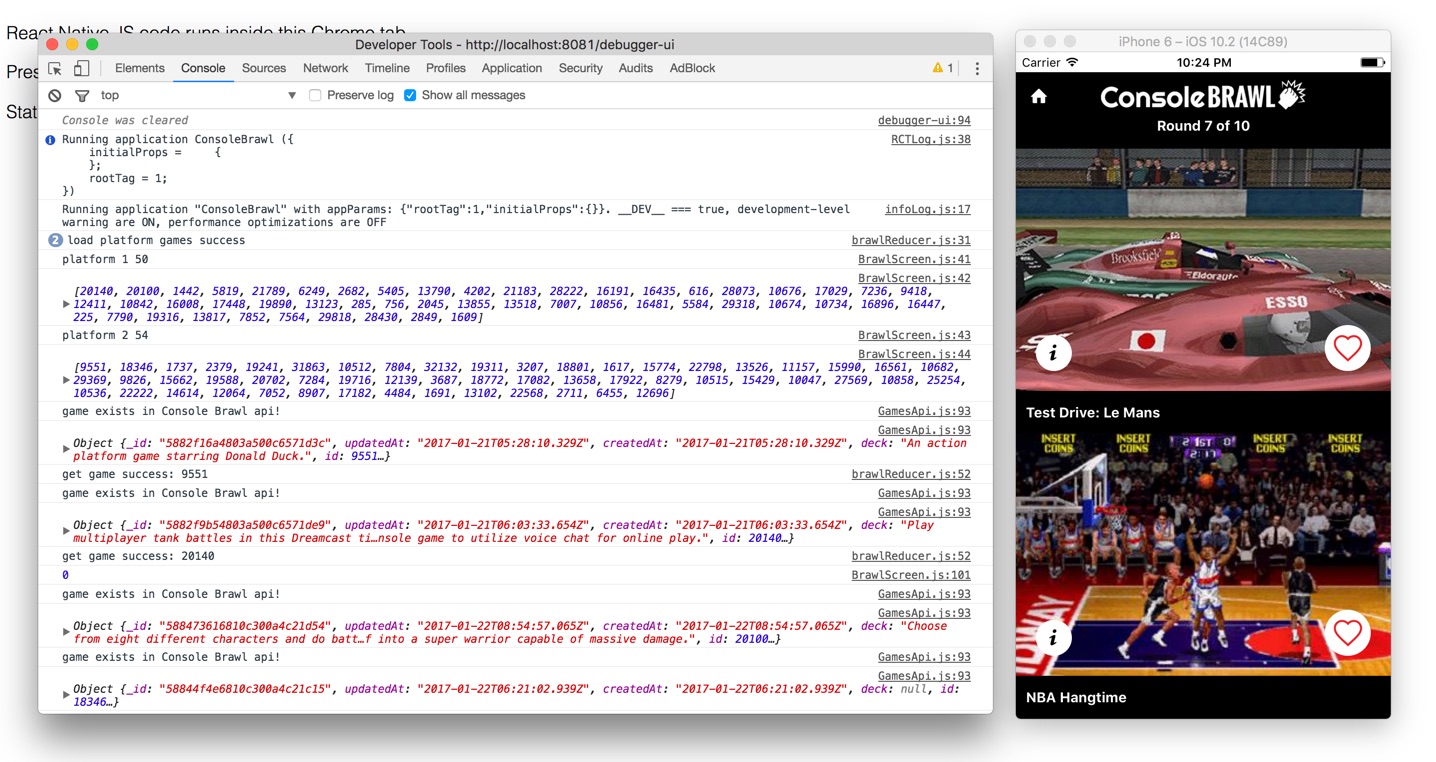
Debugging your app is done through Chrome dev tools. This doesn’t require any setup all you have to do is enable it from the app developer menu. You’ll be console logging away as usual in no time. One thing to note is that most of the other great features we’re used to having in Chrome’s dev tools aren’t available, such as the elements and network tabs. But there is an inspector that’s accessible through the app developer menu.
Publishing to App store
This is by no means a comprehensive guide to publishing to the app stores (you can find plenty of them), but rather just a quick overview of what’s involved. Publishing the android version of your app to the Google Play store doesn’t require you to jump through as many hoops as the Apple App store. It’s a fairly straightforward process and Google Play console will guide you through.
Publishing your iOS app involves a few more steps. Both stores require you to create a developer account, however to become an Apple developer you need to pay an annual fee of around $150 AUD. All apps submitted to the App Store are reviewed by Apple and must meet their guidelines in order to be approved. The review guidelines are quite comprehensive but don’t let that overwhelm you. My app was approved first go, and I didn’t dive to deeply into the guidelines.
You can do it
As I mentioned earlier, one of the main reasons I wanted to write this article is to let other front-end developers know that building a real native app with React Native isn’t that different to developing web applications. You will be utilising a lot of your existing skills and extending them when venturing into React Native development. If you want to learn more, I can’t recommend Frontend Masters course on React Native and Redux by Scott Moss enough!
I just wanted to add one last thing in regards to side projects. Working on something that wasn’t for a client, or even for a friend, but just for me was a really nice change. You can make whatever you want, when you want. Not everybody has the time to be able to do something like that, but if you do I’d highly recommend it.